Delight Loved Ones with Fanciful Scenes and Secret Messages
The June Release is absolutely packed with products that inspire creative thinking and mix-and-match possibilities. Today, Ashlea is joining us to share a delightful card that combines some of her favorite new products.

Well, hello there! I'm Ashlea, and I am overjoyed to be on the My Favorite Things blog today. Are you loving this June release as much as I am? One of my absolute favorite products from the release is the Slider Surprise Die-namics. I love that it transforms your card into a 3D display that is sure to surprise and impress anyone who receives it. Now, the die may look a little intimidating at first, but don't worry — I've got a video on the MFT channel showing you how simple it is to create, and how much fun it is to design a scene that's perfect for the pop-up aspect. Check it out HERE.
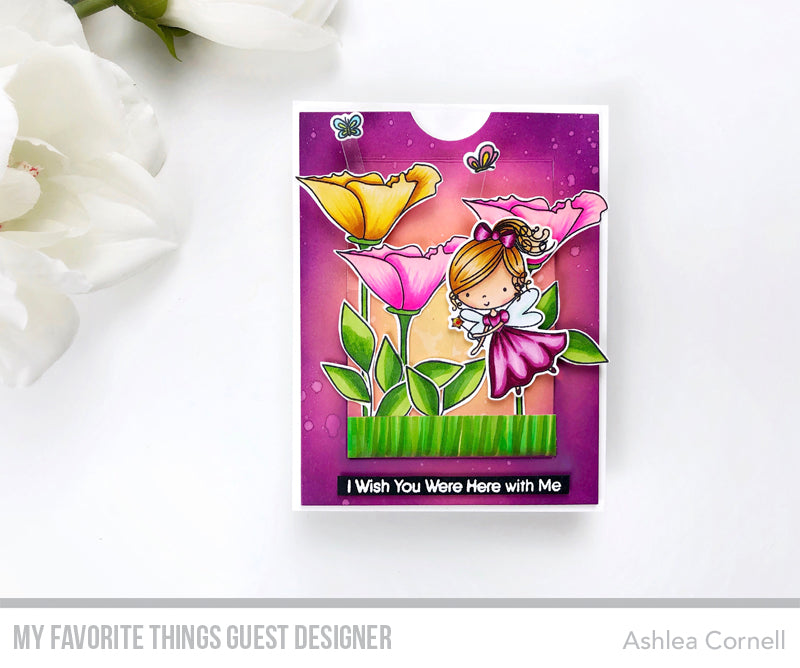
Before I die cut my card stock using the Slider Surprise die, I created the base to my scene. I found it easier to do all of my ink blending onto the card stock without any cuts or score lines in it. I knew I wanted to use an image from the new Fairy Good Friends stamp set, so I created an ethereal feel with Distress Oxides to make it appear as if the light was coming from within the center of my scene near the fairy's wand. For the colors, I used Squeezed Lemonade, Wild Honey, Picked Raspberry, Seedless Preserves, and just a bit of Faded Jeans to the very outer edge of the scene. I then spritzed it with some water from my Distress Sprayer to give it a magical feel and set that aside to dry completely.
While that was drying, I stamped my images from the Fairy Good Friends stamp set. I chose the in-flight fairy, and both small butterflies included in the set. In my coloring, I decided to add some detail to her dress to make it appear as if there were some pleating at the very bottom of it. I did that by dragging my darker colors up from the bottom in small strokes to create a textured look within the skirt. I've listed the Copic colors used for each aspect of the fairy:
Dress: RV69, RV66, RV63
Wings: BG70
Hair: YR24, YR21, YR20
Skin: E11, E21, E33
After using the coordinating dies to cut out the fairy and the butterflies, it was time to construct my Slider Surprise mechanism. I used the main die to cut out my card front from the ink-blended panel and used a piece of white card stock with the accompanying die, which activates the slide when pulled. After making a z-fold of the scored lines in the center of the card front, I adhered the slide activator piece of card stock to just the very bottom portion of the center folded piece. Now, I'm able to pull the white card stock, and it will retract the center piece causing a tent-like pop up in the middle of the card.
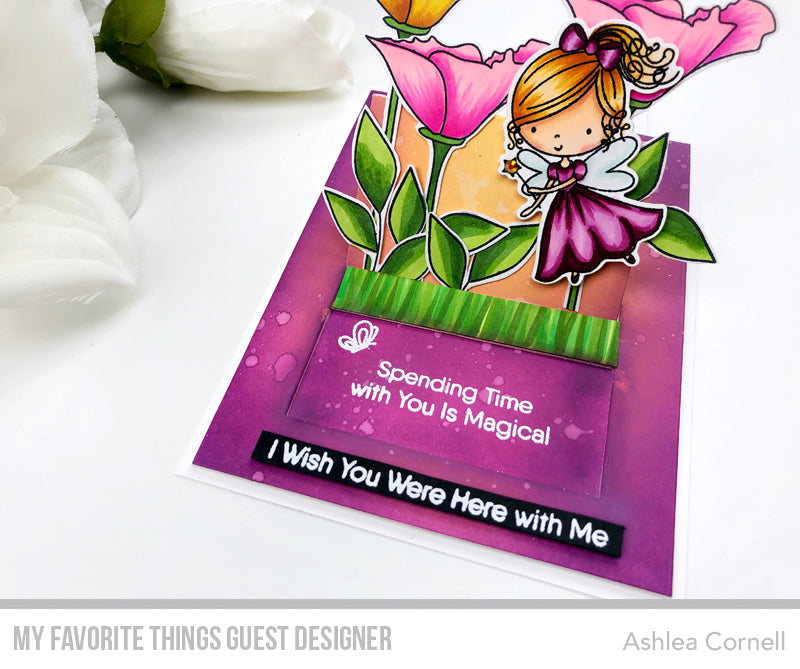
Finally, I adhered all of my images (including some flower from the Painted Poppies set) to the center portion of the card stock, being careful not to adhere anything to the top portion of the slider. This provides the 3D effect and allows the pop-up feature to work. I used the sentiment "I Wish You Were Here with Me" as my main sentiment, and stamped "Spending Time with You Is Magical" as a surprise sentiment on the inside of the slider. I adhered it to an A2-sized card base with foam tape and voila!
I hope that you've enjoyed learning a bit about how I created this magical Slider Surprise scene! This is one of those instances that the visual is extremely helpful when creating, so I hope you'll check out the video. Thank you so much for stopping by today. I'll see you again soon!
We are super excited to see what inventive ways you all come up with for showcasing the versatility of the Slider Surprise Die-namics — won't you share your ideas too? Tag us with #mftstamps when you upload so we can see what you're designing!
SUPPLIES
3 comments
so very sweet and fantastic coloring
Such a fun way to create a 3D card! The fairies are so darling from this set! As are the flowers you used! Wonderful job!
That’s gorgeous!! Love the background and the darling sweet fairy! And the interactive card makes it all the more fun :)